Detailing
Swirl Mark Removal: What Causes Them and How We Fix Them
Blackout Team· Window Tinting Experts
·7 min read
Learn what causes swirl marks on car paint, how to prevent them, and the professional paint correction techniques we use to permanently remove them.
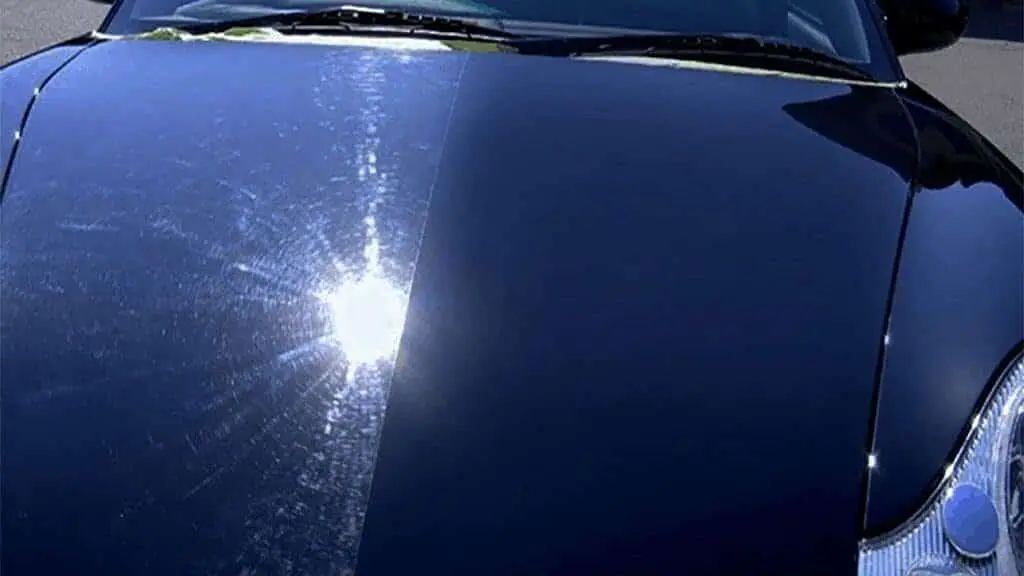
You've just washed your car, stepped back to admire your work, and there they are—thousands of tiny scratches spiraling across your paint under direct sunlight. These are swirl marks, and they're one of the most common paint defects we correct at our Gilroy shop.
What Are Swirl Marks?
Swirl marks are microscopic scratches in your car's clear coat that create a web-like pattern visible in direct light. Unlike deeper scratches that penetrate the base coat, swirl marks only affect the clear coat layer—which is actually good news because they can be permanently removed through proper paint correction.
Under LED shop lights or direct sunlight, swirl marks appear as fine circular patterns that move across the paint surface as you change your viewing angle. This distinctive pattern gives them their name.
The 6 Most Common Causes of Swirl Marks
Understanding what causes swirl marks helps you prevent future damage after correction:
1. Drive-Through Car Washes
The spinning brushes at automatic car washes are the #1 cause of swirl marks. These brushes:
- Trap dirt and debris from previous vehicles
- Spin at high speeds, grinding particles into paint
- Use abrasive materials that scratch clear coats
- Cannot rinse properly between vehicles
Our recommendation: Avoid drive-through washes entirely. Touchless washes are better, but hand washing is best.
2. Improper Hand Washing Technique
Even hand washing can cause swirl marks if done incorrectly:
- Using a single bucket (dirt gets reintroduced to the wash mitt)
- Washing in circular motions instead of straight lines
- Applying too much pressure with the wash mitt
- Starting at the top panels (where less dirt exists) instead of wheels first
3. Dirty or Worn Wash Mitts
Your wash mitt matters more than you think:
- Cotton towels trap particles that scratch paint
- Synthetic chamois becomes abrasive when worn
- Sponges hold grit in their cells
- Reusing dirty mitts between washes spreads contamination
4. Poor Drying Practices
How you dry your car can undo a careful wash:
- Using bath towels or shop rags
- Drying without a clay bar treatment first
- Rubbing instead of patting or blotting
- Using the same towel on dirty lower panels then clean upper panels
5. Improper Polishing Attempts
DIY polishing gone wrong creates some of the worst swirl marks we see:
- Using wrong pad/polish combinations
- Setting machine speed too high
- Working polish while dry (burned residue)
- Not maintaining proper pad pressure
6. Everyday Environmental Factors
Some swirl marks occur through normal use:
- Tree branches and shrubs brushing against paint
- Leaning against the car with clothing that has zippers or buttons
- Covering cars with non-breathable materials
- Bird droppings and bug splatter removal without proper lubrication
How We Remove Swirl Marks: Our 5-Stage Process
At Blackout, we use a systematic approach to permanent swirl mark removal:
Stage 1: Thorough Decontamination
Before touching a polishing pad, we remove all surface contamination:
- Foam cannon pre-wash to loosen dirt
- Two-bucket hand wash with quality mitts
- Iron fallout remover (especially critical for South Bay vehicles)
- Clay bar treatment for bonded contaminants
- Final rinse and chemical-free dry
Stage 2: Paint Depth Measurement
Using a paint thickness gauge, we measure clear coat depth at multiple points. This tells us:
- How much clear coat is available to work with
- Whether previous correction work was performed
- If any panels have been repainted (often thicker)
- Safe polishing limits for aggressive correction
Stage 3: Test Spot Correction
We don't guess at which compounds and pads your paint needs. We:
- Select a hidden test area (usually lower door jamb)
- Try least-aggressive combination first
- Increase cut progressively until defects remove
- Document winning combination for full correction
Stage 4: Machine Polishing
With proper combination determined, we systematically correct each panel:
- Cutting stage: Remove swirl marks with microfiber or moderate foam pad
- Polishing stage: Refine finish with soft foam pad and finishing polish
- Final refinement: Ultra-fine polish for maximum gloss (show cars only)
We use RUPES and Flex dual-action polishers—tools designed to deliver consistent results without burning through clear coat.
Stage 5: Final Inspection and Protection
Under our LED inspection lights, we verify complete swirl removal before:
- Full IPA wipedown (removes polishing oils for true paint reading)
- Customer walkthrough inspection
- Protection application (sealant, ceramic coating, or PPF)
Swirl Mark Correction Pricing
Pricing varies based on vehicle size and paint condition:
| Correction Level | What It Includes | Price Range |
|---|---|---|
| Light Enhancement | Single-stage polish, minor swirls | $300–$450 |
| Standard Correction | Two-stage cut and polish | $500–$800 |
| Show-Level Correction | Multi-stage with max gloss | $850–$1,200+ |
Bundle savings: Add ceramic coating to any correction and save 10–15% on the combined service.
How Long Does Swirl Mark Removal Last?
Here's the honest answer: it's permanent, but new swirls can develop.
Paint correction physically removes material from your clear coat—the swirls we correct will never return. However, if you return to improper washing habits, you'll create new swirls.
Protect Your Investment
After correction, we strongly recommend:
- Ceramic coating – Creates a sacrificial layer that swirl marks develop on (coating can be polished/reapplied)
- Proper wash techniques – We'll walk you through the two-bucket method
- Quality microfiber towels – We sell the same towels we use in our shop
- Regular maintenance washes – Removes contaminants before they bond
When Swirl Marks Are Too Deep
Not every defect can be polished out. Signs that damage exceeds clear coat correction:
- Scratches catch your fingernail
- White marks visible (exposed primer)
- Deep scratches from collision or vandalism
- Previous "correction" that cut through clear coat
For these situations, we'll honestly tell you that respray is the only true fix. We can still dramatically improve appearance through correction, but perfection isn't possible without paint work.
Book Your Swirl Mark Assessment
Not sure if your paint needs correction? Bring your vehicle by our Gilroy shop for a free paint assessment under our LED lights. We'll show you exactly what we see and recommend the appropriate correction level.
📍 Location: Gilroy, CA (just off Hwy 101) 📞 Call: 408-848-8468 📧 Email: [email protected]
Get Your Free Paint Correction Quote →
Frequently Asked Questions
Can I remove swirl marks myself?
Technically yes, but DIY correction risks include clear coat burn-through, creating holograms (polisher trails), and uneven correction. The equipment investment for proper correction exceeds $500, and technique takes years to master. For most owners, professional correction offers better results and value.
Why do some cars show swirls more than others?
Dark colors (black, dark blue, burgundy) show swirl marks most dramatically because the microscopic scratches scatter light in all directions. White and silver vehicles get the same swirl marks—they're just less visible. Red and yellow cars fall somewhere in between.
How often should I get paint correction?
Most vehicles need full correction only once. After that, proper maintenance prevents new swirl accumulation. If you maintain good washing habits and protect with ceramic coating, you may never need major correction again.
Will paint correction thin my clear coat dangerously?
Quality correction removes 1–3 microns of clear coat per pass. Factory clear coat is typically 50–80 microns thick. Even aggressive multi-stage correction rarely removes more than 10–15 microns total—leaving plenty of clear coat for future maintenance.
Related Articles
- Black Car Paint Correction Guide
- Clay Bar Treatment When Why How Often
- Diy Vs Professional Detailing Cost Comparison
31+ years
The team at Blackout Window Tinting has been serving the Bay Area since 1993, providing premium window tinting and vehicle protection services.
Window TintingPPFCeramic CoatingVehicle Wraps

