Ceramic Coating
How to Prepare Your Car for Ceramic Coating
Blackout Team· Window Tinting Experts
·Updated ·6 min read

What you need to do before your ceramic coating appointment. Complete prep checklist for maximum coating performance and longevity.
You've scheduled your ceramic coating appointment. What happens between now and drop-off determines how well your coating performs for years to come.
Proper preparation is 80% of a successful coating job.
Why Prep Matters So Much
What Happens Without Proper Prep
If coating is applied over contaminated or damaged paint:
- Contamination gets sealed under the coating
- Scratches become permanent (coating follows contours)
- Bonding is compromised
- Hydrophobic performance suffers
- Coating may fail prematurely
The Goal of Prep
Before coating touches your paint, the surface must be:
- Clean — no contamination bonded to surface
- Corrected — swirls and scratches removed
- Smooth — consistent surface for coating adhesion
- Bare — no old wax, sealant, or coatings
What You Should Do Before Your Appointment
1-2 Weeks Before
Empty your trunk completely
- Remove everything — spare tire is fine
- Coating shop needs full access
- Prevents moving your items
Document existing damage
- Take photos of any chips, scratches, dents
- Note anything you want addressed
- Prevents confusion about what's "new"
Stop using spray waxes/detailers
- These leave residue that must be removed
- Let the shop do final wash
1-2 Days Before
Give it a basic wash
- Remove heavy dirt and grime
- Don't need to make it perfect
- Shop will do proper prep anyway
Remove personal items
- Phone mounts, dash cams (if in the way)
- Garage remotes
- Anything that could fall or be in the way
Full tank of gas
- You won't be driving for a bit during cure
- Convenient to pick up with full tank
Day of Appointment
Arrive on time
- Shop schedules coating with cure time in mind
- Late arrival may push schedule
Discuss expectations
- Point out any areas of concern
- Confirm what's included
- Understand timeline
Provide contact info
- For pickup notification
- In case questions arise during prep
What the Shop Should Do
Step 1: Thorough Wash
Professional pre-coating wash includes:
- Two-bucket method or foam cannon
- Wheel and tire cleaning — separate from body
- Door jambs and seals — often-missed areas
- Under hood edges — if visible when hood is open
- Bug and tar removal — chemical treatment as needed
Step 2: Decontamination
Removing bonded contamination:
Clay bar or clay mitt treatment
- Removes industrial fallout
- Removes brake dust particles
- Creates smooth surface
- You can feel the difference
Iron remover (fallout treatment)
- Chemical that dissolves iron particles
- Turns purple when reacting with iron
- Essential for near-perfect surfaces
- Often skipped by cheap shops
Tar and adhesive removal
- Road tar spots
- Old sticker residue
- Tree sap if present
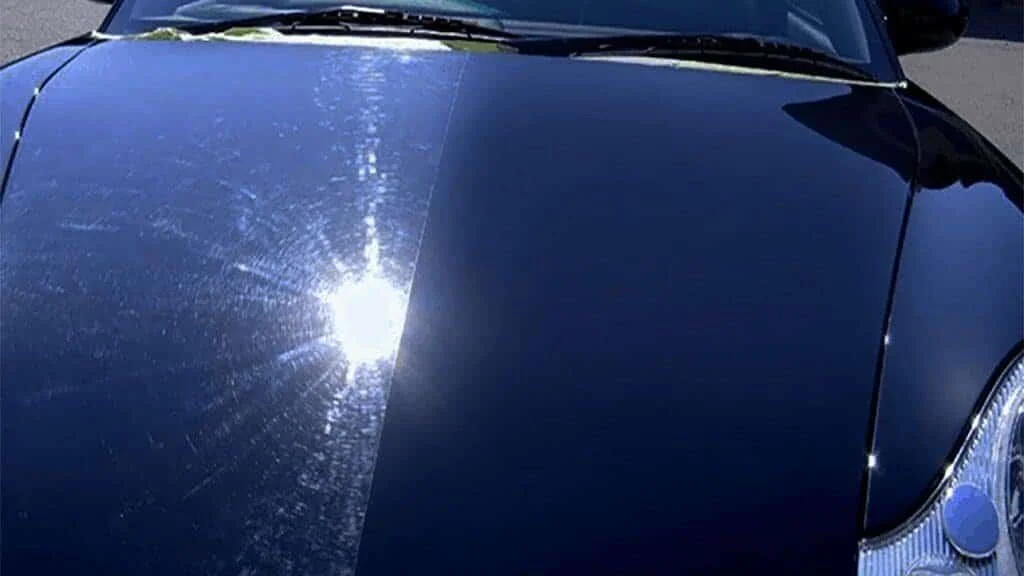
Step 3: Paint Correction
This is the most important prep step:
What paint correction does
- Removes swirl marks from improper washing
- Eliminates light scratches
- Evens out orange peel (optional, intensive)
- Creates uniform reflective surface
- Brings paint to "better than showroom"
Correction levels
| Level | Process | Best For |
|---|---|---|
| 1-Stage | Single polish | New/well-maintained cars |
| 2-Stage | Compound + polish | Moderate swirls |
| 3-Stage | Cut + compound + polish | Heavy defects |
Fair warning: Paint correction takes 4-12+ hours depending on vehicle condition. This is where the real work happens.
Step 4: Panel Wipe/IPA Wipe
After polishing:
- Removes polishing oils — these prevent coating bonding
- Ensures bare paint — nothing between paint and coating
- Critical step — never skip this
Step 5: Coating Application
Once prep is complete:
- Proper application technique
- Even coverage
- Multiple layers (if included)
- High spots removed
- Cure time initiated
Red Flags: What Bad Shops Skip
Warning Signs
❌ "We'll have it done in a few hours"
- Proper prep takes 1-2 days for most vehicles
- Fast turnaround = shortcuts
❌ "We don't need to clay bar new cars"
- All cars have contamination, even new ones
- Shipping, rail dust, dealer lot exposure
❌ "Paint correction is optional"
- It's only "optional" if your paint is already perfect
- Most cars need at least 1-stage
❌ "We can coat over your wax"
- Coating won't bond properly
- Everything must be stripped
❌ No before/after documentation
- Professional shops document work
- Protects you and them
Questions to Ask
✅ What does your prep process include? ✅ How long will this take? ✅ Is paint correction included or extra? ✅ What products do you use for decon? ✅ Can I see before/after photos of similar work?
Cost Breakdown: Where Money Goes
Typical Coating Package Price: $1,200
| Component | Estimated Cost | Why |
|---|---|---|
| Pre-wash and decon | $100 | Foundation of clean surface |
| Clay bar treatment | $50-$100 | Remove bonded contamination |
| 1-stage correction | $200-$400 | Remove defects |
| Panel wipe | $30-$50 | Strip surface |
| Coating product | $150-$300 | The actual ceramic |
| Application labor | $200-$400 | Skilled technician time |
| Cure space/time | Varies | Shop overhead |
Prep is typically 60-70% of the job cost. The coating itself is almost secondary.
New Cars: Still Need Prep?
Common Misconception
"My car is brand new, just coat it!"
Reality
New cars often have:
- Rail dust from train transport
- Dealer "protection" products (often low-quality)
- Installer damage from accessories
- Lot wash swirls from quick dealer details
- Buffer holograms from PDI (pre-delivery inspection)
Even new cars need decontamination and usually light correction.
New Car Prep Includes
- Removal of dealer products
- Decontamination process
- Minor paint correction (typically 1-stage)
- Full panel wipe
- Coating application
Get Your Coating Done Right
We include thorough prep with every coating package:
📞 Contact us — ask about our prep process
📍 Visit our shop — see our correction bay in person
Visit the Experts in Gilroy
Blackout Window Tinting is the Bay Area's premier choice for premium auto protection. Based in Gilroy at 610 Holloway Rd (behind Target), we've served the South County and Silicon Valley area for over three decades. Whether you're coming from Morgan Hill, Hollister, or anywhere else in the Bay Area, we're your trusted local source for professional window tint, PPF, and ceramic coating.
📞 Questions? Call us at 408-848-8468 or get a free quote online.
Related Articles
- Paint Correction vs Ceramic Coating: Which First?
- Ceramic Coating Cost Bay Area 2026
- Ceramic Coating for New Cars
Related Services
33+ years
The team at Blackout Window Tinting has been serving the Bay Area since 1993, providing premium window tinting and vehicle protection services.
Window TintingPPFCeramic CoatingVehicle Wraps