Detailing
Paint Decontamination: Clay Bar vs Chemical Decon Explained
Blackout Team· Window Tinting Experts
·7 min read
Learn when to use clay bar vs chemical decontamination. Complete guide to removing embedded contaminants and preparing paint for coating or polishing.
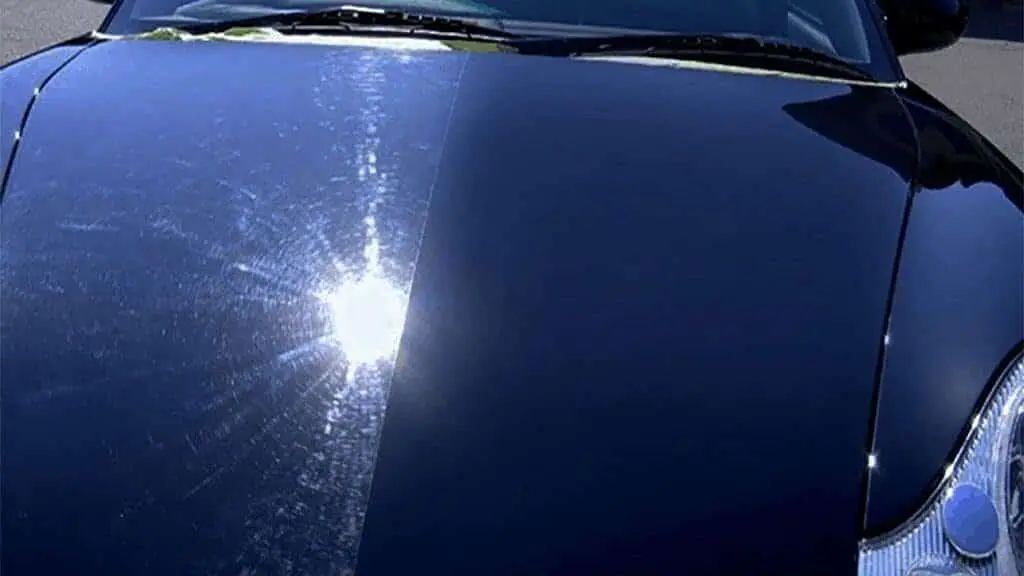
You just washed your car. It looks clean. But run your hand across the paint—it feels rough, gritty, textured.
That's contamination. And regular washing can't remove it.
Understanding when to use chemical vs mechanical decontamination is essential for proper paint care—especially before polishing or applying ceramic coating.
What Is Paint Contamination?
Contamination is foreign material bonded to your clear coat that washing alone won't remove:
Ferrous (iron-based):
- Brake dust
- Rail dust (from train transport)
- Industrial fallout
- Metal shavings from road construction
Organic:
- Tree sap
- Bug residue
- Bird droppings (embedded)
- Tar
Other:
- Paint overspray
- Road film
- Mineral deposits from hard water
These contaminants cause:
- Rough paint feel
- Reduced gloss
- Paint degradation over time
- Poor coating/wax adhesion
Two Decontamination Methods
Chemical Decontamination (Iron Remover)
What it is: A spray-on product containing chemicals that dissolve iron particles embedded in paint.
How it works: Active ingredients react with iron particles, breaking their bond to the clear coat. The reaction typically turns the product purple, showing where iron is present.
Use for:
- Brake dust
- Rail dust
- Industrial fallout
- Metal particle contamination
Advantages:
- No physical contact = zero scratch risk
- Works in 2-5 minutes
- Reaches areas clay can't (grills, emblems, textured trim)
- Essential before polishing wheels
Limitations:
- Only removes iron-based contamination
- Won't remove tar, sap, or overspray
- Strong odor (hydrogen sulfide smell)
- Must be used on cool paint
Mechanical Decontamination (Clay Bar)
What it is: Synthetic clay compound that physically lifts and removes bonded contaminants when glided across lubricated paint.
How it works: The clay grabs onto contaminants and pulls them from the surface, trapping them in the clay body.
Use for:
- Tar
- Tree sap residue
- Overspray
- Road film
- Bug deposits
- Remaining iron after chemical decon
Advantages:
- Removes nearly all contamination types
- Leaves glass-smooth finish
- Essential prep for coating/PPF
- Precise control over problem areas
Limitations:
- Can cause marring if technique is poor
- Requires adequate lubrication
- Must discard if dropped
- Labor intensive for full vehicle
Which Method Do You Need?
The Bag Test
After washing, put your hand in a plastic sandwich bag and rub across the paint:
- Smooth — Paint is clean
- Slightly gritty — Light contamination (chemical decon may suffice)
- Rough/sandpaper feel — Heavy contamination (both methods needed)
Recommended Approach
For comprehensive decontamination, use both methods in order:
- Chemical first — Dissolves iron particles
- Clay second — Removes everything else
Why this order? Iron particles are sharp. Claying over embedded iron can drag those particles across the paint, causing scratches. Chemical decon dissolves them safely first.
Chemical Decontamination: Step by Step
What You Need
- Iron remover (IronX, Carpro, Adams, etc.)
- Microfiber towels
- Hose or pressure washer
- Gloves (optional but recommended)
Process
1. Wash vehicle first Remove loose dirt so the iron remover contacts actual contamination.
2. Work in shade, on cool paint Direct sun and hot panels cause premature drying.
3. Spray section by section Work one panel at a time—don't let product dry.
4. Wait 2-5 minutes Watch for purple/red color change indicating iron reaction.
5. Agitate if needed Light brush or wash mitt on heavily contaminated areas.
6. Rinse thoroughly Pressure washer preferred. Flush all product from crevices.
7. Repeat if necessary Heavy contamination may require two applications.
Pro Tips
- Also use on wheels (major brake dust collector)
- Safe for most trim, glass, and chrome
- Work in 60-80°F temperatures if possible
- Avoid letting product contact rubber or matte surfaces
Clay Bar Decontamination: Step by Step
What You Need
- Clay bar, mitt, or towel
- Clay lubricant (or quick detailer spray)
- Microfiber towels
Process
1. Wash and dry (or use after iron remover) Clean surface allows clay to work on contamination, not dirt.
2. Knead clay into flat disc About 2-3" wide, exposing fresh clay.
3. Liberally spray lubricant On both the paint AND the clay. Never clay a dry surface.
4. Glide clay across paint
- Light pressure only
- Straight lines (not circles)
- Repeatedly spray more lubricant as you work
5. Check clay frequently Fold and knead to expose clean clay when surface gets dirty.
6. Wipe panel with microfiber Remove lubricant residue, feel for smoothness.
7. Repeat until smooth Move systematically across entire vehicle.
Critical Rules
- Keep surface lubricated — Dry claying causes serious scratches
- Discard dropped clay — Ground debris in clay will destroy paint
- Light pressure only — Let the clay do the work
- Fold frequently — Never drag dirty clay across fresh paint
Clay Alternatives
| Product | Speed | Aggressiveness | Reusable |
|---|---|---|---|
| Clay bar | Slow | Medium | No (limited) |
| Clay mitt | Fast | Medium-high | Yes |
| Clay towel | Medium | High | Yes |
Recommendation: For DIY, clay mitts offer good balance of speed and effectiveness. Professionals often use traditional clay for delicate paint.
When Decontamination Is Required
Always Decontaminate Before:
- Paint correction/polishing — Contamination causes scratches during polish
- Ceramic coating — Coating bonds poorly over contamination
- PPF installation — Film won't adhere properly
- Sealant application — Reduced longevity over contamination
Signs You Need Decontamination:
- Paint feels gritty after washing
- Orange/brown spots visible on light paint
- Water doesn't bead properly
- Wax/sealant doesn't last
After Decontamination
Once decontaminated, your options:
If paint is defect-free: Apply sealant, wax, or ceramic coating directly.
If paint has scratches/swirls: Polish to correct defects, then protect.
Timeframe: Protect within 24 hours of decontamination—exposed paint attracts new contamination quickly.
Decontamination at Blackout
We perform professional decontamination as part of:
- Paint correction packages
- Ceramic coating prep
- PPF installation prep
- Standalone decontamination service
Our process uses:
- Professional-grade iron removers
- Premium clay products
- Proper technique to avoid marring
- Inspection under proper lighting
📞 Request a decontamination quote
📍 Visit our Gilroy shop — see our paint correction work. Explore our detailing services →
Visit the Experts in Gilroy
Blackout Window Tinting is the Bay Area's premier choice for premium auto protection. Based in Gilroy at 610 Holloway Rd (behind Target), we've served the South County and Silicon Valley area for over 30 years. Whether you're coming from Morgan Hill, Hollister, or anywhere else in the Bay Area, we're your trusted local source for professional window tint, PPF, and ceramic coating.
📞 Questions? Call us at 408-848-8468 or get a free quote online.
Related Articles
31+ years
The team at Blackout Window Tinting has been serving the Bay Area since 1993, providing premium window tinting and vehicle protection services.
Window TintingPPFCeramic CoatingVehicle Wraps