Detailing
Clay Bar Treatment: When & Why You Need It
Blackout Team· Window Tinting Experts
·Updated ·5 min read

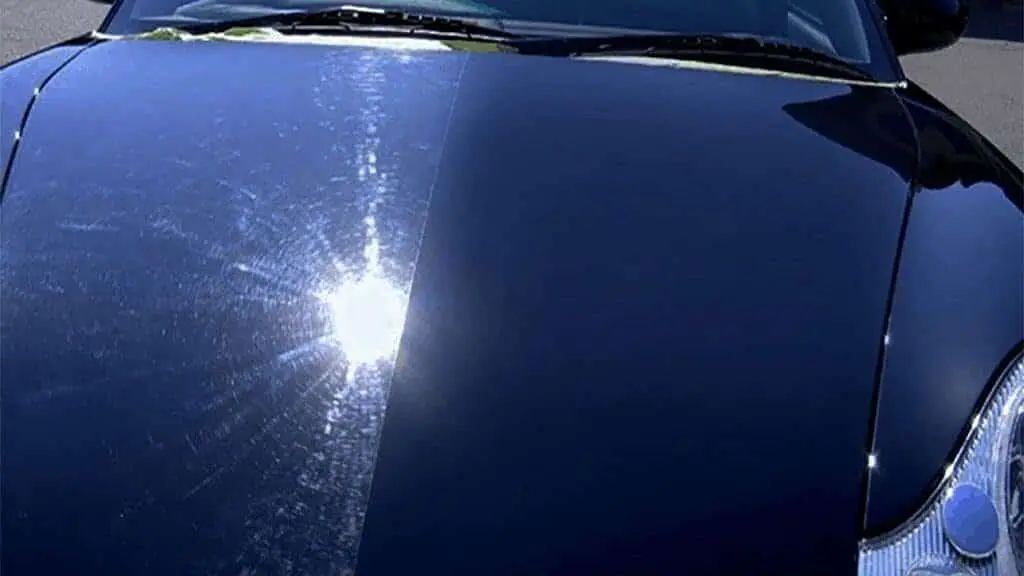
Your car might look clean but feel rough. That's contamination, and clay bar is the only way to remove it. Here's what you need to know about this essential
Your car might be freshly washed, waxed, and gleaming.
Run your hand across the paint.
Feel those tiny bumps? That rough, gritty texture?
That's contamination. And no amount of washing removes it.
What Clay Bar Actually Does
Clay bar (or clay mitt) is a specially engineered material that picks up surface contaminants bonded to your clear coat. Think of it as sticky enough to grab particles but soft enough not to scratch.
What it removes:
- Industrial fallout
- Rail dust (iron particles from trains)
- Brake dust embedded in paint
- Overspray (paint/primer from nearby work)
- Tree sap residue
- Mineral deposits
- Bug splatter residue
- Road tar remnants
What it doesn't remove:
- Scratches
- Swirl marks
- Oxidation
- Deep stains in the clear coat
Clay bar restores smoothness, not clarity. That requires polishing.
The Baggie Test
Want to know if your car needs claying?
Put your hand inside a plastic sandwich bag, then run it across a freshly washed panel. The plastic amplifies what you feel.
Smooth like glass? You're fine.
Feels like fine sandpaper? Clay bar time.
Most cars that haven't been clayed in a year fail this test—even garaged vehicles.
Why Contamination Matters
1. Wax and Sealants Don't Bond Properly
Apply wax over contamination, and you're just sealing the particles in. The wax sits on top of the grit, not the paint. Result: shorter protection, worse shine.
2. Ceramic Coatings Require Clean Paint
This is critical. Ceramic coating over contaminated paint means:
- Reduced coating lifespan
- Bumpy texture locked in
- Poor bonding = peeling
Every quality ceramic coating installation includes clay bar treatment. It's not optional.
3. Polishing Over Contamination Causes Marring
Polish compounds need to work on the paint, not embedded particles. Polishing contaminated paint grinds particles into the clear coat, causing scratches instead of removing them.
4. It Just Looks Wrong
Even with perfect wax, contaminated paint reflects light poorly. The surface irregularities cause micro-shadows that dull the finish.
The Clay Bar Process
Step 1: Wash Thoroughly
Clay bar on a dirty car is asking for scratches. Wash completely, ideally with a foam cannon or two-bucket method.
Step 2: Prepare Clay Lubricant
Never clay dry paint. You need constant lubrication to prevent marring.
Options:
- Detail spray (best for beginners)
- Dedicated clay lubricant (best performance)
- Diluted car wash soap (budget option)
Step 3: Section By Section
Work in 2ft x 2ft sections. Spray lubricant generously.
Step 4: Clay Motion
Glide clay bar or mitt across the surface with light pressure. No need to push hard—let the clay do the work.
Pattern: Back and forth, not circles. Circles can create scratches.
Sound: You'll hear the contamination being picked up. Starts gritty, ends smooth and quiet.
Step 5: Check and Knead
After each section:
- Wipe with microfiber
- Check smoothness with baggie test
- Knead clay bar to expose fresh surface
Drop rule: If clay bar hits the ground, throw it away. It picks up debris that will scratch your paint.
Step 6: Rinse and Dry
Final rinse removes any clay residue. Dry completely before wax or next steps.
How Often Should You Clay Bar?
| Driving Conditions | Clay Frequency |
|---|---|
| Garage-kept, light use | Every 12-18 months |
| Daily driver, normal conditions | Every 6-12 months |
| Industrial area, construction, roadwork | Every 3-6 months |
| Near railroads or airports | Every 3-4 months |
| Before any coating application | Always |
General rule: If it fails the baggie test, it needs clay.
Clay Bar vs Clay Mitt vs Clay Towel
Traditional Clay Bar
Pros:
- Most thorough decontamination
- Gets into curves and edges
- Best for heavy contamination
Cons:
- Slowest method
- Must knead frequently
- Drop it once = trash it
Clay Mitt
Pros:
- Faster than traditional clay
- Washable and reusable
- Harder to drop
Cons:
- Slightly less aggressive
- Harder to work tight areas
- Higher upfront cost
Clay Towel
Pros:
- Fastest method
- Works on large flat panels quickly
- Reusable
Cons:
- Least thorough
- Struggles with curves
- Not for heavy contamination
Our preference: Traditional clay bar for professional work, clay mitt for maintenance.
DIY Clay Bar: What You Need
| Item | Price | Notes |
|---|---|---|
| Clay bar kit (bar + lubricant) | $15-30 | Enough for 4-6 cars |
| Detail spray (for lubricant) | $10-15 | Get extra, you'll use more than expected |
| Microfiber towels | $10-20 | Several for wiping |
| Plastic bags | $0 | For baggie test |
Total investment: $35-65 for supplies lasting multiple uses.
Common Clay Bar Mistakes
Not Enough Lubricant
Problem: Clay drags and creates marring
Solution: Keep surface wet. If it starts to feel sticky, add more lubricant immediately.
Too Much Pressure
Problem: Aggressive claying leaves marks
Solution: Let the clay pull contamination—it doesn't need force.
Claying Dirty Paint
Problem: Grinding dirt into clear coat
Solution: Wash thoroughly first. If in doubt, wash again.
Reusing Dropped Clay
Problem: Ground debris scratches paint
Solution: Throw it away. The new clay bar costs less than a paint correction.
Skipping Before Coating
Problem: Contamination locked under ceramic coating
Solution: Clay bar is mandatory before any coating application.
Professional Clay Bar Treatment
When should you let a pro handle it?
DIY Works For:
- Basic maintenance
- Light contamination
- Vehicles you're familiar with
- When you have time to do it right
Go Professional For:
- Before ceramic coating or PPF
- Heavy contamination (industrial fallout, construction)
- Black or dark paint (shows scratches easily)
- Pre-sale prep where quality matters
- Vehicles you're not confident working on
Professional Clay Bar Costs
| Service | What's Included | Price Range |
|---|---|---|
| Clay Bar Only | Full decontamination | $150-275 |
| Clay + Polish | Decontamination + single-stage polish | $250-450 |
| Clay + Wax | Decontamination + hand wax | $200-350 |
| Full Prep for Coating | Clay + polish + prep for ceramic | $350-600 |
Clay Bar at Blackout Window Tinting
Clay bar treatment is included in all our ceramic coating packages and available as a standalone service.
What we include:
- Full wash and inspection
- Traditional clay bar on all painted surfaces
- Re-wash to remove residue
- Optional: wheel and glass claying
Paired services:
- Ceramic Coating — clay bar included
- Paint Correction — required before correction
- Full Detail Package — available add-on
📞 Get a clay bar quote — mention your vehicle and condition
📍 Visit our Gilroy shop — see the difference yourself
Visit the Experts in Gilroy
Blackout Window Tinting is the Bay Area's premier choice for premium auto protection. Based in Gilroy at 610 Holloway Rd (behind Target), we've served the South County and Silicon Valley area for over 30 years. Whether you're coming from Morgan Hill, Hollister, or anywhere else in the Bay Area, we're your trusted local source for professional window tint, PPF, and ceramic coating.
📞 Questions? Call us at 408-848-8468 or get a free quote online.
Related Articles
- Protection Options: Ceramic Coating vs. Wax
- Full Detail: Full Detail vs Express Detail
- Maintenance: How Often Should You Detail?
- Service Page: Clay Bar Treatment
Clay Bar FAQs
Does clay bar remove scratches?
No. Clay bar removes surface contamination, not scratches or swirl marks. Those require polishing or paint correction.
Can clay bar damage paint?
Only if used improperly—without enough lubricant, on dirty paint, or with dropped/contaminated clay. Used correctly, it's completely safe.
Is clay bar necessary before waxing?
Not every time, but recommended at least once or twice a year. Wax bonds better to decontaminated paint.
How long does clay bar treatment last?
Results last 3-12 months depending on driving conditions, parking location, and environment. Industrial areas contaminate faster than suburban garages.
31+ years
The team at Blackout Window Tinting has been serving the Bay Area since 1993, providing premium window tinting and vehicle protection services.
Window TintingPPFCeramic CoatingVehicle Wraps